Portraits

Individual Side Comp

1. Hal
2. 5/20/2012, 8 PM
3. Blackfoot, ID
4. f/5.6
5. 1/100
6. Canon EOS Rebel T3, Tripod.
I snapped this picture of Hal, my father in law, before he was quite ready and giving me overly faked smiles. There was something about his face that made me like this picture, some kind of seriousness that I don’t often see out of him. I attempted to bring that out with the temperature of the picture. As a smart object, I kicked back and forth between PS and CR. The temperature was cooled, the burned edge was added, and as a final touch I used a brush in camera raw to lower the exposure on the brighter parts of his face.
Head or Head and Shoulders

1. Hal – Head and Shoulders
2. 5/20/2012, 8 PM
3. Blackfoot, ID
4. f/5.6
5. 1/100
6. Canon EOS Rebel T3, Tripod.
This shot is much more representative of my father in law. I got rid of the serious feel of the previous picture and made it more warm and inviting. I sharpened his eyes a touch, and I used the brush in CR to lower the exposure of his face on the bright side. I kept this edit as simple as possible.
Individual – Full Body

1. Connie – Full Body
2. 5/20/2012, 8 PM
3. Blackfoot, ID
4. f/5.6
5. 1/160
6. Canon EOS Rebel T3, Tripod.
I had a hard time finding a full body shot that I liked of anyone. I had little time this week for a photoshoot, and was limited to a three hour break in between work and other responsibilities over the weekend. (These shots outside actually occurred during the eclipse.) I found my mother in law Connie being sassy to my wife Melissa about something or other before I was “ready” to shoot. The picture seemed unposed and much more natural than my other shots. Burned edges, temperature adjustments and exposure were all that I changed to counteract the still bright sun.
Group Activity
1. Movie Night
2. 5/20/2012, 10 PM
3. Idaho Falls, ID
4. f/5.6
5. 1/4
6. Canon EOS Rebel T3, Tripod.
My group activity pictures from the weekend photoshoot did not turn out well at all. Everything looked fake because people were too aware that the camera was on them. I opted to find a different shot once I saw the photos on my computer. The problem? 10 PM that night. My sister and brother in law were upstairs watching a movie, so I took this as an opportunity. My sister had a migrane, but still wanted to see the movie. I sat down with the camera after I had told them I would be taking their pictures and I waited until the movie took the focus away from me before beginning to snap away. The facial expressions in this shot show how into the movie Tyrel was and how poor my sister felt.  I used a longer shutter length to brighten up the dark room and then midly warmed the picture in CR. A light burned edge moved the focus from the light switch to the real focal point.
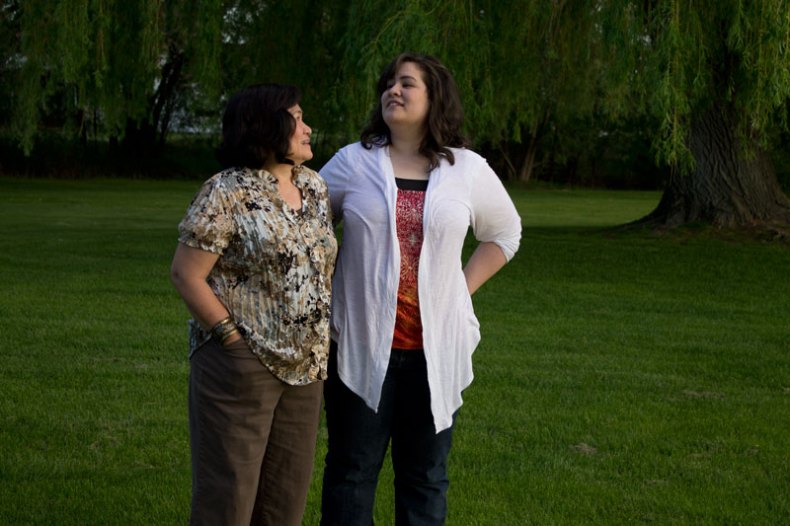
Group Posed

1. Hal and Connie
2. 5/20/2012, 8 PM
3. Blackfoot, ID
4. f/5.6
5. 1/100
6. Canon EOS Rebel T3, Tripod.
Most of these shots did not turn out well, as the poses seemed too posed. This one is somewhat cheesy, but my wife loved it. It was certainly the best of this group. I warmed the photo up in CR and adjusted the colors to bring out the green. I then added a burned edge (which is MUCH lighter in my final photos, this “web optimized” picture makes the burned edge look far too obvious. I need to figure that one out still.)
Group Environmental
1. Connie and Carter
2. 5/13/2012, 7 PM
3. Blackfoot, ID
4. f/5.6
5. 1/100
6. Canon EOS Rebel T3, Tripod.
This is my mother in law with my nephew. Connie runs a daycare and this is what she does day in and day out. She adores her first grandson, and this is on of many pictures of the two of them that turned out great, I cooled the picture down just a touch to get rid of the yellowish indoor light. I did a few touchups to Carter, including sharpening his eyes and removing a rather large stream of drool that became more and more prominent as I took this series of pictures.

Portrait Edits

Portrait Enhancements

Edit

ImageOriginal

Image

1. Carter
2. 5/13/2012, 7 PM
3. Blackfoot, ID
4. f/5.6
5. 1/80
6. Canon EOS Rebel T3, Tripod.
I tried to keep this edit simple. After a few minor adjustents in Camera Raw, I tinkered a but in Photoshop. The first thing I did was an adjustment mask for Carter’s eyes. I sharpened them, increased the contrast, and increased the exposure. From there, I used the clone stamp, the clone brush, the healing brush, and the spot healing tool to remove some minor imperfections. I removed some veins showing through Carter’s thin skin, touched up his somewhat wild eyebrows, and cleaned up little spots where he had the standard issue baby “goop” on his face.

Match color

Edit

Image


Original

Image


Color Match Source

Image


1. Melissa and Mom
2. 5/20/2012, 7:30 PM
3. Blackfoot, ID
4. f/5.6
5. 1/200
6. Canon EOS Rebel T3, Tripod.
While snapping one of the few pictures of my Wife (who did not want to be on camera) I switched to the auto portrait setting on my camera. This was a mistake, and the flash engaged and washed out a lot of the color. As this was one of the only good shots, I tried the color match feature. While not perfect, the color change is apparent and makes a large difference.
Color Replacement
Edit

Image


Original

Image


1. Hal 1
2. 5/20/2012, 7:45 PM
3. Blackfoot, ID
4. f/5.6
5. 1/100
6. Canon EOS Rebel T3, Tripod.
I did not have many good photos for a color replacement, so I used a photo that did not quite make the cut for the other post as Hal’s shirt made an excellent target for color replacement. This was done using a simple adjustment mask. I played with the hue of the entire picture, and then erased the mask except for his shirt. This allowed the rest of the picture (particularly his face) to remain natural, but for his shirt to change to orange.

Camera Raw Edits

Edit #1


1. Lock
2. 5/9/2012, 9 PM
3. Idaho Falls, ID
4. f/5.0
5. 1/60
6. Canon EOS Rebel T3, Tripod.
I saw this rusty lock and chain after most of the good light was gone on a short photography expedition. I dropped everything and snapped a few shots, which turned out to be my favorites from the trip. This photo is edited entirely in Camera Raw. I darkened the image up and brought out some of the colors. I then used a brush to increase the exposure on the chain and lock, and then to lessen the sharpness on the background. Last, I used a brush to add burned edges with lower exposure.
Edit #2

1. Reflection
2. 5/9/2012, 8:30 PM
3. Idaho Falls, ID
4. f/22.0
5. 1/25
6. Canon EOS Rebel T3, Tripod.
This shot breaks a standard photography rule to achieve an end goal. As you can clearly see, I shot directly into the sun. This was a striking view to my eye, and I hoped to be able to capture it on camera. As expected, the colors were washed out and the sky was blown out. I used Camera Raw to first cool the image off a touch, then to lower the exposure. I played with contrast and clarity to bring out the lowlights and the ripples in the water. I then used a brush to lower the exposure of the sky and sun. I painted over each section of background so that the foreground was not overwhelmed. The sky is still blown out, and I will never be able to get the color there, but the sky was not the focus. The reflection, the dramatic lighting through the trees, and the gleaming sun were the priorities in this shot.
Challenge Shot
 

1. Sign
2. 5/9/2012, 8:45 PM
3. Idaho Falls, ID
4. f/25.0
5. 1/25
6. Canon EOS Rebel T3, Tripod.
Another shot on the way back from the photo excursion this week. The good light was mostly gone, so I set up my tripod and took a longer shot than normal to compensate. I shot this shot as a RAW file and edited it in Camera Raw. I brightened up the exposure, turned down the saturation on the eerily green grass, added a tiny bit of contrast, and added a simply burned edge using exposure and a brush. This photo did not require much editing other than the small amount to compensate for the dim light. The photo was saved as a Smart Object to go back and forth between CR and PS.

Panoramas

Panorama #1

1. Path

2. 5/9/2012, 8 PM
3. Idaho Falls, ID
4. f/4.5
5. 1/60
6. Canon EOS Rebel T3, Tripod.
This shot was much harder to capture the way my eye saw it than I expected. The tunnel look I hoped to capture simply did not exist in the photos, but I tried to bring it out anyway. This photo takes little explanation. I took three shots from the ground up and stitched them together automatically in Photoshop. I used Content Aware fill to patch up the holes left from the distortion correction. I then made basic edits in Camera Raw. I added a slight burned edge effect in Camera Raw using brushes and adjusting the exposure level.
Panorama #2

1. Train
2. 5/13/2012, 8:45 PM
3. Idaho Falls, ID
4. f/5.6
5. 1/125
6. Canon EOS Rebel T3, Tripod.
This shot, I will be honest, was rushed. I had been attempting to get a shot of this train parked about 2 blocks from my house all week, but whenever I was able to take pictures the sun was out and glaring bright. Tonight, as I came home from my inlaws, it dawned on me that the light was just about perfect. I hoped out of my car with my camera and covered the distance across a field to get to the train before the cool lighting vanished. As this was not really expected to be a part of my blog, but rather just a random chance for a cool shot, I left my camera on auto exposure as I took a quick pano. This caused the ground in the last two frames to darken WAY too much. When I stitched everything together in Photoshop, the end look, no matter how flawed, looked too stunning for me not to use. (My other panos were mediocre at best, though the did not have the exposure issue.)  This panorama is composed of 8 shots. THIS LINK contains a larger version on my personal website, as the one above is tiny because of the length of the shot.  In Camera Raw, I used the brush tool with the exposure setting to make a more natural transition into the darker right frames. Previously the transitions were abrupt and terribly obvious. I used CR to brighten up the sunset a touch. I went back to Photoshop to use CA to fill the missing sections (which was a terrible experience, my worst so far.) I had to play for a very long time to avoid duplicating powerlines, railroad tracks, and bars. The finishing touches were done with the clone stamp. The final edit is not as refined as I would like, but it was a great learning experience.

Flora and Fauna

1. Flowers
2. 5/4/2012, 9:30 AM
3. Idaho Falls, ID
4. f/3.5
5. 1/400
6. Sony DSC-Hx9V, Tripod.
These flowers were in a rather off place in the middle of a bunch of greenery while my Wife and I visited the zoo. The light was rather intense, so there was editing involved to bring this photo to life, but I was fascinated with the colors from the moment I turned the exposure down. The colors (except the brightest whites) remained mostly untouched once the exposure was adjusted. This shot was taken from underneath this plant on my tripod. Capturing the sky was not the object, but rather the side effect of my tripod being slightly too short. I used a fast shutter speed and a low ISO to attempt to not overexpose this shot, but it did anyway, leading to the previously mentioned exposure adjustment.
———-

1. Duck
2. 5/4/2012, 9:30 AM
3. Idaho Falls, ID
4. f/5.9
5. 1/320
6. Sony DSC-Hx9V, Tripod.
The waterfowl were the biggest pain of the day. From the sun shining in the wrong places to the elementary school kids throwing food pellets at the animals I was taking pictures of, nothing turned out. Except this single shot. I almost passed it up, but decided to tinker with the levels in Camera Raw. A little adjustment here and there and suddenly the water color was not gross looking, the duck’s blue bill was not pale, and the ripples looked like what I saw with my own eyes.
This shot was taken on a tripod looking down into the water. After chasing ducks with the pistol grip and focus, I ended up just waiting, zoomed in close and hoping for the best. This shot came when the duck wandered into my viewfinder and stopped. By the time I snapped the shot, the duck was on the move again, but not before my burst mode kicked in and got a single clean(ish) shot. In Camera Raw, I played with exposure, temperature, lights and darks, highlights, and color hues. The idea was to bring the photo back to what I saw with my own eyes.
———-

1. Peacock
2. 5/4/2012, 10 AM
3. Idaho Falls, ID
4. f/5.9
5. 1/200
6. Sony DSC-Hx9V, Tripod.
The peacocks were everywhere in the zoo. I could not get a decent shot of their colors to save my soul the entire walk through the facility. At the very end, as we rushed out of the zoo to keep an appointment, I saw this peacock up ahead strutting his stuff. A couple of shots in the distance did not turn out well, but I found a better viewpoint closer to him. I turned on burst mode and took a bunch of shots as he turned around. I was using my tripod as a monopod (the legs together but fully extended) because of the rush I was in. The moment I took my last shot and closed the tripod, the peacock put his tail down and ran into his shelter. I used very little adjustment in this shot. I turned up the contrast a tiny bit, and then slightly intensified the blue to help keep the green (feathers and grass) from washing the photo out.

Flexible Editing

Edited.

Original.

1. Watch (Edit Top, Original Bottom)

2. 5/3/2012, 1:30 PM
3. Idaho Falls, ID
4. f/.5
5. 1/250
6. Sony DSC-Hx9V, Tripod, Indoors.
My wife bought me a super fancy, automatic watch for my birthday recently. The entire thing is powered by a spring, which is tightened by the pendulum visible inside the watch. The watch even has a glass back, allowing you to see through it. I decided that I wanted to try to capture the moving parts (particularly the gold colored wheel) in a frozen still. Turns out the wheel moves faster than my camera can handle. I ended up with this image and thought it was too cool to waste.
The problem with the original (on the bottom) is the reflection of the florescent lights from above. I adjusted the temperature setting in Camera Raw to tone the yellows down to the steel blue and silver that looks the closest to my watch in real life. The foreground glare was still too much and made the picture look a bit washed out. I used an adjustment mask to help this. I added a brightness mask and took the brightness down a couple notches. I then erased the mask with a soft brush over everything except the “U” shaped area in front of the watch. The result was a still bright and crisp watch with a toned down foreground.
 ———-
Edited.
Original.
1. Lion
2. 5/4/2012
3. Idaho Falls, ID
4. f/5.9
5. 1/250
6. Sony DSC-Hx9V, Tripod.
My wife Melissa and I paid a visit to the zoo in Idaho Falls as a part of the Flora and Fauna blog post. One of my favorite images, this lion, did not quite fit the bill for the blog post. The lion decided to park himself right next to the fence at the back of the enclosure. The original image had nice and crisp background garbage. I was already zoomed in really tight and did not have any room to play with. The lion was also determined to sleep, and this is one of a tiny handful of images (of many taken) where his head is up and he doesn’t look like a carcass.  I decided to try to fix this for the Flexible Editing blog post.
I began with a quick color touch up in camera raw. The clouds were rolling in as I took shots, so I rarely had my manual adjustments just right. I then added a smart filter. I used a gaussian blur over the entire image and then removed the blur with a soft brush over the lion, the grass at the same depth, and the rock he was on. I allowed the foreground to remain blurred to add depth. The blur helped to take the focus off of the fence and the trees behind the lion.


Blends

This image was done very simply. I warmed up the colors of the initial picture and simply put a transparent rock texture over it. I wanted to see the nice, warm colors age this shot though the transparency.


1. Clock
2. 4/29/2012, 10 AM
3. Idaho Falls, ID
4. f/5.0
5. 0.4
6. Sony DSC-Hx9V, Tripod, Indoors.


1. Rock Texture
2. 4/25/2012, 6 PM
3. Idaho Falls, ID
4. f/13
5. 1/25
6. Sony DSC-Hx9V, Tripod


This blend was also fairly simple. I used the same rock texture to create the wording and added a drop shadow. I played a little with the transparency in order to soften the image, and then I added it into my picture.


1. Light
2. 4/29/2012, 10 AM
3. Idaho Falls, ID
4. f/4.5
5. 0.3
6. Sony DSC-Hx9V, Tripod, Indoors.

Color Study

1. Lemon Slices
2. 4/28/2012, 10 AM
3. Idaho Falls, ID
4. f/11
5. 1/6
6. Sony DSC-Hx9V, Tripod, Indoors.
We received GIGANTIC lemons the other day, larger than most oranges. I sliced them thin to be able to do this shot and discovered very thick rinds and a terrible palid color. I used natural light from outside to bring out the best of what color was there (and to keep the white plate from yellowing due to poor indoor lighting) and took shots with a low ISO and shutter speed to extract as much color and detail as possible. I then made moderate Photoshop adjustments to bring out the yellow to a natural looking level.
1. Lego Table
2. 4/29/2012, 10:30 AM
3. Idaho Falls, ID
4. f/5
5. 0.8
6. Sony DSC-Hx9V, Tripod, Indoors.
I took this shot of my niece’s Lego table to try to feature the large proportion of yellow colors on it. It took quite a bit of manipulation of the camera distance and the zoom to get this shot. I again tried to use the natural light from outside to keep the colors crisp.
1. Birthday Decorations
2. 4/29/2012
3. Idaho Falls, ID
4. f/4.0
5. 1/30
6. Sony DSC-Hx9V, Tripod, Indoors.
Leftover birthday decorations from a few weeks ago made for an interesting shot. I used the tripod, got close to the first object, and zoomed in a bit. I lightened the colors of the background objects to bring the focal attention to the decorations.
1. Yellow Ace
2. 4/27/2012
3. Idaho Falls, ID
4. f/4.5
5. 1/80
6. Sony DSC-Hx9V, Tripod, Indoors.
I took this shot of one of the 300+ decks in my collection on a shiny black tabletop. The reflection of the box was completely unintentional. I did, however, capitalize on it once I noticed it. I turned the blacks up unnaturally high to hide the imperfections and scrapes on the table and adjusted a few other elements to make the reflection as clear as possible. A focus point on the lower left hand corner of the card allowed for sufficient blurring  at the top of the shot.

Priority Modes

Image

1. Blurred Waterfall – Blurred Image
2. 4/25/12, 7 PM
3. Idaho Falls, ID
4. f/5.5
5. 1/25
6. Nikon D5100, Tripod
This was a difficult shot to get without a long zoom. This was as zoomed in as I could get. The sky was cloudy, and the sun was coming in behind me, so there was a lot of bight light in the sky. I had to play with the ISO levels to get this shot to have the cool feel with the bright sky.

Image

1. Waterfront Star – Shallow Focus
2. 4/25/12, 7:30 PM
3. Idaho Falls, ID
4. f/3.5
5.1/4000
6.Nikon D5100, Tripod
This was my first shot of the night. I wanted to see more blur in the background but was unable to make this happen. I was intrigued by the highly saturated colors, and I attempted to bring them out in this photo in Camera Raw.
Image
1. Temple Over the River – Deep Focus
2. 4/25/12, 7:00 PM
3. Idaho Falls, ID
4.f/18
5. 1/1000
6. Nikon D5100, Tripod
As I was packing up for the night, I saw the setting sun cast some dramatic light on the temple, so I hurried and took a few shots. High ISO and a fast shutter speed lead to the colors that I wanted instead of a white streak.

Image

1. Lion Fountain
2. 4/26/12, Noon
3. Rexburg, ID
4. f/10
5. 1/1250
6. Sony DSC-HX(V, Tripod
I was looking for motion to freeze without having people stand in for a jumping photo, which I think is extremely tacky. I found the water and decided that it would suffice. Of of my favorite photos this week. Low ISO, quick shutter speed,

Edit – Cutouts

Duck Partial Cutout

10/15/2011, 11 AM

Green Belt, Idaho Falls, ID

f/5.9

1/250 sec.

Sony DCS-HX9V

Duck Full Cutout

10/15/2011, 11 AM

Green Belt, Idaho Falls, ID

f/3.3

1/30 sec.

Sony DCS-HX9V


My cutouts were not as smooth as I would like. The background of the image prevented easy automatic selection, and I have discovered that I am not great with the cleamup. It took me a long time to be get things as smooth as they are, which is not that impressive. I am now more aware of what kind of background I need to find for cutouts for simple editing. I think I did a fair job, and would rate myself at 85%.